
This article will talk about sticky elements, what they are, and their purpose on your website. Also, you will get a chance to learn more about one of the best plugins to create them.
However, we want to point out the importance of hosting platforms for your website before we begin. Make your visitors feel secure and make website optimization much easier for you. Have you ever heard about WPMU DEV?
WPMU DEV’s all-in-one WordPress platform gives you everything you need to manage, update, optimize, secure, and host client sites – all under one roof. Get 20% off any of their plans here.
Furthermore, let’s buckle in and begin learning about sticky elements!
What Are Sticky Elements and What Do We Use Them for
Sticky elements are trendy on most websites. As the name implies, their position is sticky, which means they do not change position when you scroll down your website. It means that those elements are available regardless of the user’s position. The sticky position makes them more visible from other components and improves the user experience.
Some studies, for example, have found that sticky call to action buttons increase conversion rates. So, if you have an eCommerce website, make your add to cart button sticky and test tray to increase your sales.

Any of the elements in your website can be sticky, but one of the most popular is the header, for sure. Users can scroll at the bottom of your website, but the navigation still be visible, and user experience (UX) will be good.
The sticky header is most noticeable on long one-page websites. However, you will get a lot of advantages if you embed this header on your website. Some of them are:
- With available navigation, users can quickly browse your website
- You will increase awareness of your brand because your logo will be visible all time
- If you embed social icons in your menu, your visitors can share your website on social networks more often, increasing your traffic.
After those advantages of sticky elements, let’s talk about methods to make those elements on our website. You can use CSS to create and arrange sticky elements or use plugins (of course, if you use WordPress). Additionally, adding sticky elements with plugins is preferable because the CSS method is not always supported across multiple browsers.
A lot of plugins are available for this purpose. One of them is the WP Sticky plugin that we recommend for creating sticky elements quickly and easily. The following will be about the advantages and instructions for using this plugin.
WP Sticky – Features and Pricing
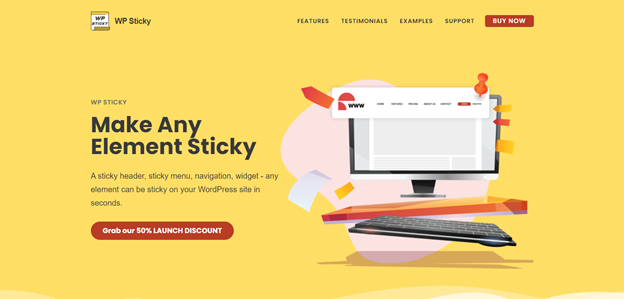
If you want to create a sticky header, call to action button, or a widget, this plugin is for you. With the WP Sticky plugin, you can make every element sticky in your website.
The plugin has many useful features that make them suitable for people who don’t have any coding experience. It is only necessary to choose the element you want to be sticky, give it’s a name, and make them sticky. If approximately 100 000 people use this plugin, it means that it serves its purpose. Also, it allows you to create outstanding sticky elements in a matter of seconds.
As we mentioned, navigation is the most often sticky element on the website, but it could be any other element too. You also don’t have to worry about other plugins or themes on your website because WP Sticky is compatible with all of them.
However, if you stack with the plugin for some reason and have a problem you can’t resolve alone, you can contact support. You will get help from people who built a plugin directly and recognize every mistake faster than others.
It is crucial to adapt its design for desktops and laptop, mobile phones when we make a website. For example, some sticky elements look good on desktops but not on mobile phones. WP Sticky fits those rules and allows you to pick devices that you don’t want to make into sticky elements.
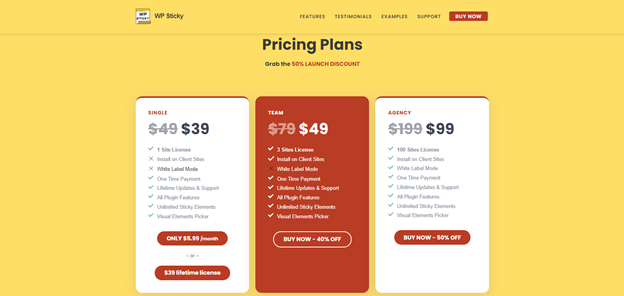
The plugin is available in three pricing plans: Single ($39), Team($49), and Agency($99). Aside from the price, the main difference between those plans is the Site License feature. The first plan has one site license, whereas the second two have three and one hundred site licenses.
How to Use WP Sticky Plugin: Step by Step
Now, let’s pass through all steps about using this plugin, from the purchase to the final usage.
Step 1: Click on the button from the top right corner: “BUY NOW.” Then, you will see the section Pricing plan with three plans. Choose one of them that fits your needs best and click on “Buy Now.”
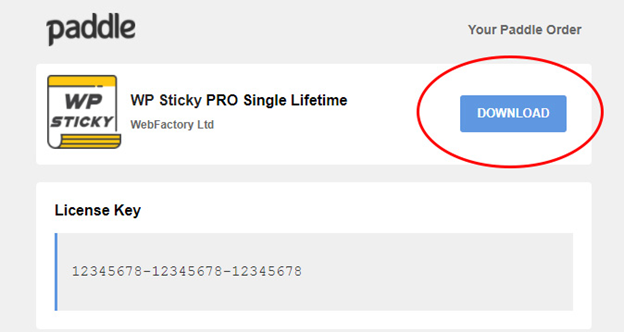
Enter your email address, select a location, and click the “Continue” button. The only thing left to do is choose a payment method (Pay by Card or PayPal), and that’s it. After a few minutes, you will get an email with your license key and a download link that makes you ready for the next step, installing this plugin.
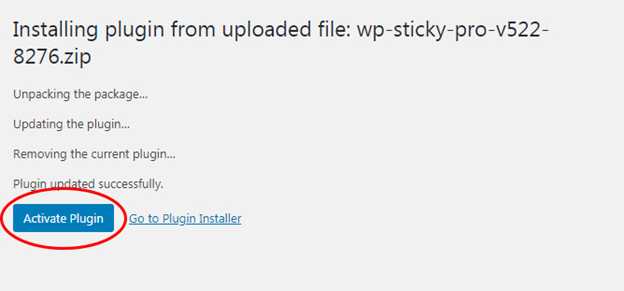
Step 2: The email mentioned above with the download link will take you to the zip folder that contains the plugin. Download the folder to your computer first.
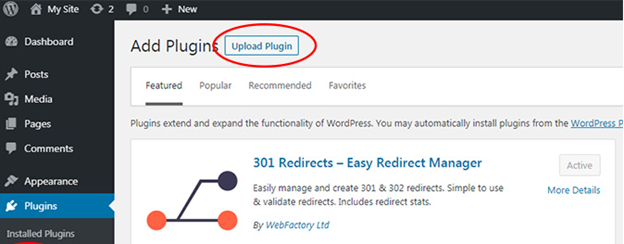
Then, open your WP site ->Dasboard->Plugins->Add new and upload your WP Sticky PRO plugin.
It’s only left to activate your plugin: Settings->WP Sticky PRO->enter your license key.
Step 3: Now it’s time to add and customize your sticky element. Go to Plugins->WP Sticky and discover all the excellent features that the plugin offers.
First of all, choose the “Add New Sticky Element” from the left side of your screen.

For an element to be sticky, it is necessary to give it a name. That can be anything you want. We recommend using terms associated with the sticky details to quickly find them when you want to customize or delete them.
After giving a name for your sticky element, click on the “Pick Element” (below the name) and choose an element you want to make sticky. The plugin will lead you to your website, where you select the element you want.

It’s a simple process. Select your element by Hover and click on them. When you go back to your plugin, right from the “Pick Element” button will be text like this: header#masthead>div.col-full.
The text is the ID of the element you chose, which will be recognized by your plugin and become sticky. Don’t forget to save your changes by clicking the “Save changes” button in the top right corner.
The plugin allows adding more than one sticky element, and the process is the same. When you finish adding all of them, click on the “Add New Sticky Element” and “Save changes.”
If you already know the element ID you want to be sticky, type or paste it instead of clicking on “Pick Element.”
OK, you have added your sticky element. Everything work, but what know? Is it end here? Of course, it is not. Knowing the customization of your piece comes to the fore. Clicking on the “Visual,” a dropdown menu will be open, and you will see a lot of options for sticky elements customization.
Customizing Elements
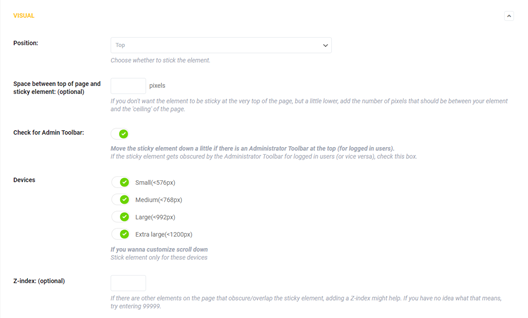
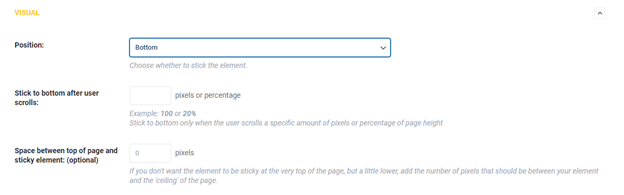
Further, let’s customize your sticky elements. The first option is the position of your sticky element. You have the option of choosing between top and bottom. If you chose the top part of the page for your sticky piece, you can leave some space between the element and the top of the page (px). It is not required, but it can improve the user experience.
On the other hand, if the bottom is the position of your sticky element, you will see one more option that you can put the number: Stick to bottom after user scrolls (px,%). For example, if you put 50px, your sticky element will be stuck on the bottom when the user scrolls for 50px.
Check for Admin Toolbar Option will allow administrators to view sticky elements as all users. All administrators logged in WP site can see the administrator toolbar on the top of the screen. Enable this option to prevent the toolbar from covering the sticky element.
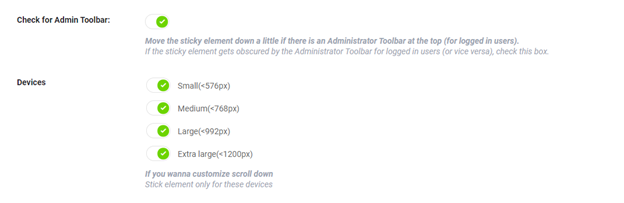
WP Sticky is a responsive plugin that allows you to select devices for sticky elements. Some sticky features, for example, look great on the desktop but not on the mobile phone. The option Devices is also available, as shown in the image above. No worries, just look at the first option for small devices.
Let’s see what do we use for those options in the picture below:
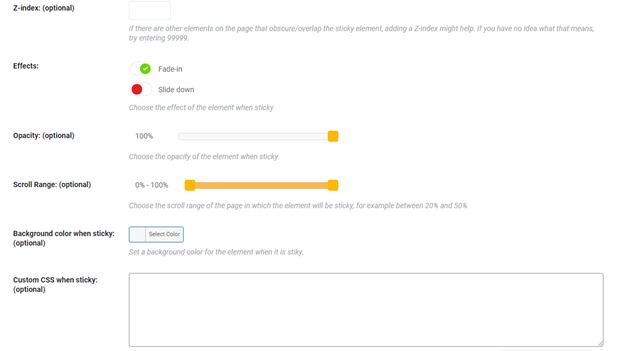
Z-index is a CSS option that orders elements one over the other. Your sticky feature might show behind other components. That’s where the z-index comes to the fore. Enter 99999 in this option, and your sticky element will be visible.
You can choose one of the two effects: Slide Down or Fade In, which will show your sticky element.
If you want to play with the transparency of your sticky element, move the slider right or left and choose the opacity of the sticky piece.
The Scroll Rang option allows you to make your element sticky only after the user scrolls past 30% or any other value you specify here.
If your sticky element becomes less visible on some pages, use the color picker button to change its background color.
And at last, if you are familiar with the CSS and want to add some additional customization, the custom CSS option is right for you.
Advanced Settings
WP Sticky offers some other advanced settings that you can use for arranging your sticky elements. The following will be more about some of them.
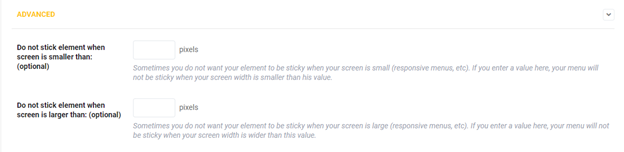
- Do not use a sticky element when the screen is larger than X.
- Do not use a sticky element when the screen is smaller than x. Enter the width of your screen in pixels, and your sticky feature will not be displayed if the screen is wider or narrower than the number specified.
- Push-up element: this option allows you to choose one piece you want sticky element will push that up.
- Do not stick here: ass you can see in the picture above, this option is available too. That means you can choose a specific page, post, category, or tag where the sticky element will not be displayed.
And, in the end, if you don’t like your sticky element more, press DELETE ELEMENT in the bottom left corner and create the new one. Be careful because this is not reversible.

Conclusion
Lately, sticky elements, especially sticky navigation, are becoming a must-have in all websites. When you have a WordPress website, all additional functionality you are extending with plugins. Sticky elements are no exception to this rule, as well.
The previous was about a plugin that quickly and easily makes any element sticky. If you still haven’t started making your sticky elements, it’s the right time to install WP Sticky and enjoy all its features.